Create a Graphical Model for the HAND Algorithm
2. Setting the Model Properties
In this section we'll setup a graphical model in the QGIS Model Designer.
1. In the Processing Toolbox panel, click Models  icon and choose Create New Model... from the drop-down menu.
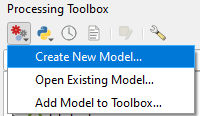
2. Maximize the new window of the Model Designer.
3. Let's first enter the Name and Group in the Model Properties section. Give it the Name Height Above Nearest Drainage. For Group write Hydrology. The model can then be found in the Processing Toolbox under Models | Hydrology | Height Above Nearest Drainage.

Let's save the model. You can save models in your QGIS profile or in your project. If you save the model in your profile, it will be available for all projects that you work on from that profile. In this case you use the Save model as  icon to save a .model3 file under \profilename\processing\models . If you only want to use the model in this project use the Save model in project
  icon.
icon.
4. Choose one of the options to save your model.