
Fire Risk Map
Learn how to create a Fire Risk Map using QGIS and remote rensing.
4. Weighted Overlay Analysis
4.2. Slope
Next up is the Slope layer. This includes the slope’s steepness in degrees. Your analysis should have a maximum of 40 (in this case being 33) degrees as the steepest. We are going to classify them in easy 5 degree steps.
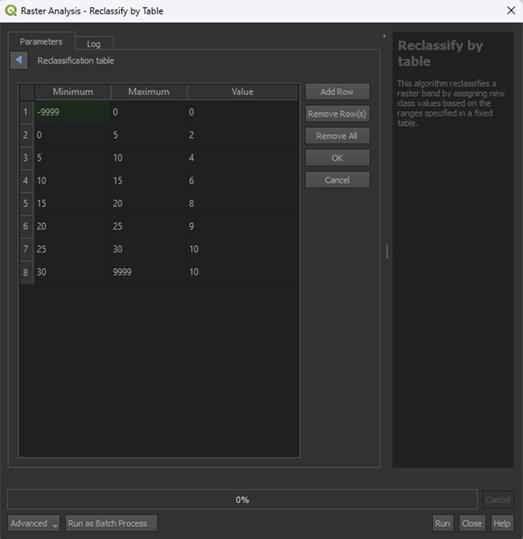
1. Open the Reclassify by table tool again and make sure the Slope_Fill layer is selected.
2. In the table, fill in the values down below:
|
Minimum |
Maximum |
Value |
|
-9999 |
0 |
0 |
|
0 |
5 |
2 |
|
5 |
10 |
4 |
|
10 |
15 |
6 |
|
15 |
20 |
8 |
|
20 |
25 |
9 |
|
25 |
30 |
10 |
|
30 |
9999 |
10 |
Again, remember to click OK afterwards and not Run before you have saved the layer.
Research has shown that areas with a steeper slope are more susceptible to forest fires. This is because with a steeper slope, rainwater runoff is faster, and the soil is unable to store it in time. Leading to these areas being dry. Fire is also more likely to spread faster on steep uphill slopes. The spread of fire is not the main issue in this module, but it does mean that the area is more likely to be heavily affected by a fire. Research shows that the steeper the slope, the higher the fire risk. This is why the higher slopes in the table above have been given a higher risk value.
You may notice how we use 9999 as the final maximum value. Research has shown that a slope of 30 degrees or more is considered 'high risk'. The slope may be higher than 30 degrees in certain areas, this is why we set the highest value to 9999. It will include everything above 30 degrees. If your study area has slopes that are very steep, like cliffs, you might want to set a limit instead, like 60 degrees, then set all higher values to a score of 0.
An example of what can be put in on the bottom of the table if you have cliffs in your area is included below. We do not have cliffs, so you DO NOT have to include this row. You can just proceed to step 3.
|
Minimum |
Maximum |
Value |
|
30 |
60 |
10 |
|
60 |
9999 |
0 |
3. Click OK after filling in the table.
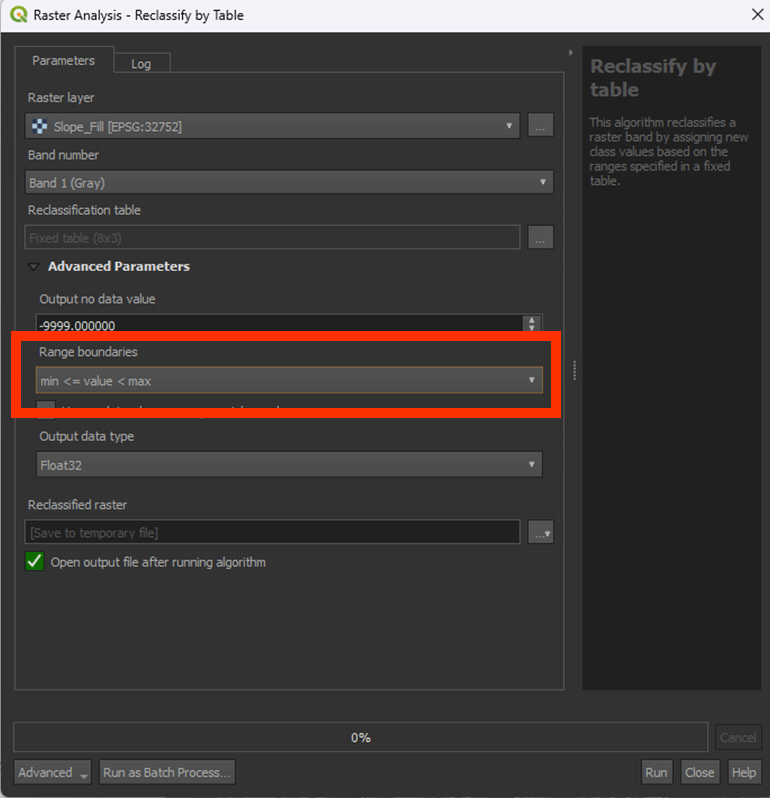
4. Click Advanced Parameters to set the Range Boundaries on min <= value < max. The tool may get confused otherwise with the -9999 value.
Note: look closely at the way the "<" and ">" are pointing, this does matter.
5. Save the Permanent layer as Slope_Reclassified. Once done, Run the tool.
The result should have values between 0 and 10. This case in the example being 0 to 10.

Don’t forget to save your project.